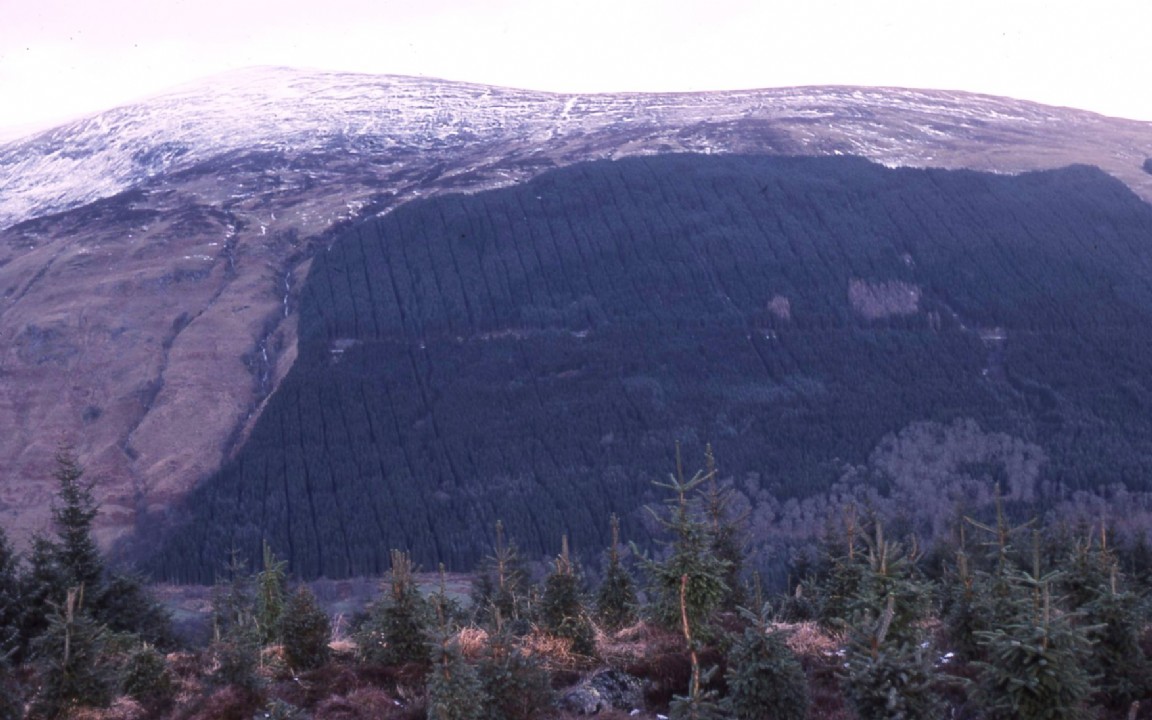
Cablecrane course Glengarry Forest
The photograph is courtesy of the family of George Dey. George took many forestry photographs in his forestry career and many are now shown on this web site. Check under ‘Groups’ and George Dey Collection.
A great photograph showing the forest on the west side of the glen which has been well racked and thinned. The section above the middle road has particularly well laid out racks running fairly parallel to each other. This was a difficult task usually achieved but pegging out lines with the help of a compass on a set bearing – not as easy as it sounds:
1. On steep slopes the early compasses were limited as they had to be kept flat and sighting had to be done through a raised arm with a wire sight which was very difficult in dark conditions.
2. The line passed through thick impenetrable Sika spruce with branches to the ground.
3. The line invariably from time to time passed through the centre of trees and it was very difficult to continue the line onwards.
The usual method was to start pinning out a straight line with a set of bright coloured ranging rods or canes with coloured flags on a set bearing from the road side. The aim was to continue as long as possible by this method brashing the trees with an axe along the line as you went for visibility and access. If the line ran into a tree you could sometimes bypass it by setting up a new line a foot or so off to the side of your last few marking pegs and then getting new pegs back on line beyond the tree. Sometimes there was no option but to use the compass bearing again but it was difficult to be absolutely sure that it was accurate in the darkness, on the slopes and from the very short distances that you could see.
Once you reached the top of the plantation with the line, a suitable Spar tree in the middle of the line had to be selected on which the skyline and haul back cables would be rigged. This was well marked with paint as were the spar tree anchor trees behind. All the trees within the rack way (about 5 feet either side of the centre line) were then blazed with an axe to signify removal by the fellers but on the way suitable sets of trees for the skyline cable support blades were also identified and marked with paint. Once several racks were marked the areas in between them would also be walked over and the trees to be thinned also blazes with an axe.
A bent rack was not appreciated by the winch team! A one degree deviation over 300 metres resulted in the rackway being 5 metres off to one side at the extreme end. It was possible to get around slight bends by pulling over the skyline cable support arms with additional ropes but more often another line of trees had to be felled off the side of the rack or more likely the portion beyond the bend was not extracted.
It would be great to get more stories of lining up and marking rack ways.
Download Large Version (275kB)
Groups: Forestry Areas, George Dey Forestry Collection, Timber harvesters, processors, forwarders and cable cranes
3 Comments
If I remember correctly in thick brash it was hard to see the lights more than 20 yards! Comment left on 27 January 2013 at 21:00 by
Sighting down a steep hill was indeed tricky but constantly taking a sight back up the hill as a check usually kept you right. Comment left on 27 January 2013 at 22:15 by Andy MacNicol